


How to Make Subtitles for your Media Content?
A Step-by-Step Guide to Creating Fast and Effective .srt Files for Your Video and Audio Content

In this blog article, I'll show you some simple and effective ways to add captions to your videos. More specifically, I'll dive into the world of building an SRT file from scratch. I'll also share how you can speed up the process using an AI tool.
What’s an SRT file?
First, let's break it down: what exactly is an SRT file?
SRT stands for SubRip Subtitle, and it contains plain text information of the spoken words alongside their respective start and stop times.
The great news is that most social media platforms support SRT files. Take YouTube, for example. It allows you to easily upload your subtitle file when you're uploading your video.
Captions vs Subtitles
Now, let's clear up a common confusion: captions vs. subtitles. We often use these terms interchangeably, but there's a slight difference.
Captions provide word-by-word text of what's being spoken in the video, making them perfect for the same-language audience. On the other hand, subtitles are similar to captions but with the added benefit of being translatable to different languages. For example, if you want to make your English video accessible to a Turkish audience, you can have English captions and Turkish subtitles. In some cases, captions are even used as a complete replacement for subtitles.
The Format of an SRT File
Let’s check out the format of a .srt file. An SRT file includes sequence of subtitle frames. And each subtitle frame consists of four components:
Sequence number of the caption frame (subtitle frame)
Start and end time info
The subtitle (or caption)
A blank line (used for having another caption sequence)
Here is an example:
The first frame of an SRT file of this video would be as follows.
1
00:00:00,000 --> 00:00:07,160
If you are new to the Python language and you want to install and use it on your Mac,
Here is the screenshot showing how all captions of the video looks like in a text file.

The first line includes the sequence number of the caption frame.
The second line consists of start and end time sections separated with a right arrow (—>). A time section is written in the following format:
hour:minute:second,millisecondLet's take a closer look at the timing of the captions. The first caption frame appears from the very beginning of the video and lasts until 7 seconds and 160 milliseconds. Moving on to the second caption, it starts at 7 seconds and 160 milliseconds and ends at 9 seconds and 720 milliseconds. The subsequent frames follow this consistent format.
Feel free to experiment with these start and end times, finding the perfect fit for your video. Play around with different durations and see which timing works best for your content. It's all about creating a seamless viewing experience for your audience.
Now, let's focus on the third line of the caption frame. This is where you can input your desired caption text. Keep in mind that captions can span across multiple lines.
Lastly, take note of the blank line that signifies the conclusion of each caption frame. It acts as a clear indicator, ensuring proper organization and readability of your captions.
With these simple guidelines, you'll be able to craft well-structured captions that enhance the accessibility and understanding of your video content.
Simplify the Process with Speech-to-Text AI Platforms
When dealing with short videos, manually typing captions for each time period may suffice. However, this process can become extremely tedious and exhausting when it comes to longer video files.
The definition of what constitutes a "long" video varies from person to person. Personally, even a 5-minute video feels lengthy when it comes to typing out captions. Thankfully, there's a solution: speech-to-text AI platforms. These platforms automate the captioning process, making it significantly easier and more efficient. One such platform is ToText, which offers powerful speech-to-text capabilities for FREE.
Now, let's dive into how you can use this AI tool with the same video. Just follow these simple steps:
Open your preferred browser, navigate to https://totext.ai/app.
Choose the language of your video and upload the video file.
If you're not signed in, provide your email address and click the "Run" button.
An email containing a passkey will be sent to you automatically. Retrieve the passkey from your email and click the "Next" button.
Once the processing is complete, the output will be displayed for you to access and utilize.
By leveraging a speech-to-text AI platform like ToText, you can save yourself valuable time and effort, especially when dealing with longer video files. Embrace the power of automation and simplify the captioning process with ease.
Here are the step-by-step instructions in detail.
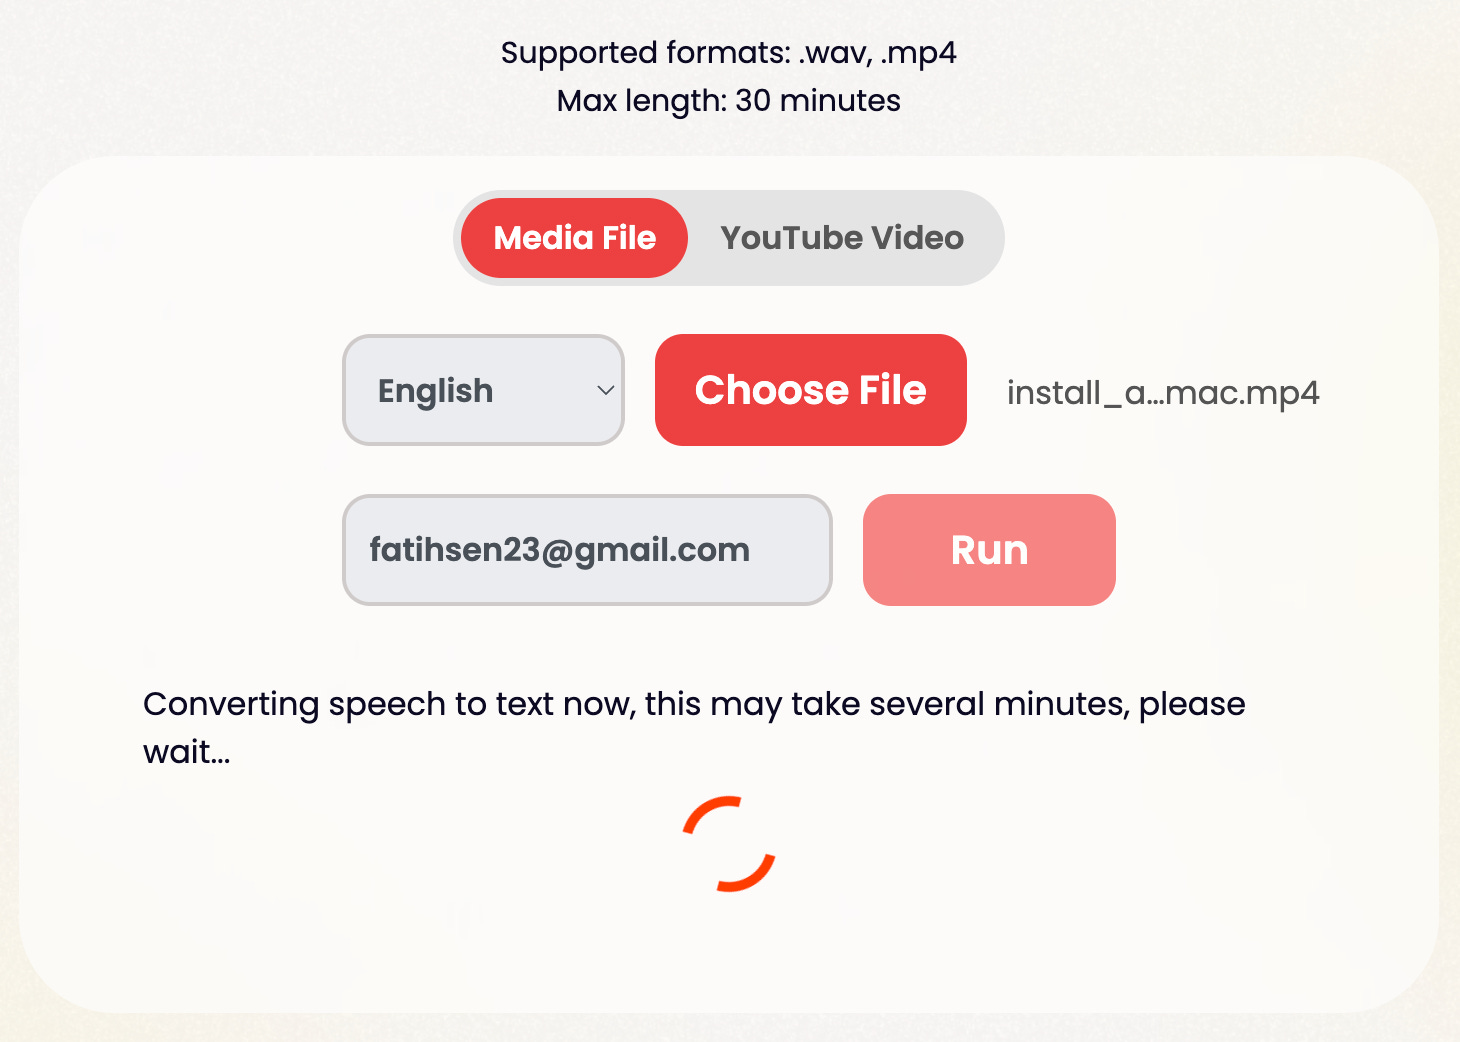
Step 1: After typing the url, you’ll see the app interface below.

Step 2 & 3: Select the language of the video, choose the media file either in .wav or .mp4 formats, enter your email, and click the “Run“ button.

The app will load and start processing your media file. You’ll have to wait for some time for the video to be processed. This waiting time really depends on size as well as the quality of your media file. For example, a 10-minute video typically takes around a minute.
Step 4: You won’t have to apply this step if you are already signed in. If not, simply enter the passkey that has been emailed to your after successfully processing your file.

Step 5: Once the video has been processed successfully and the passkey was entered (if not signed in before), the application will present the results to the user, including valuable information about the media file. The output will include tabs for both the transcript and captions.
By default, the “Transcript” tab will be displayed, showcasing all the spoken words within the media file. This transcript can be put to great use in numerous ways, such as crafting a compelling blog article or creating a concise summary of your video. It offers a wealth of possibilities, thanks to the power of ChatGPT.
Speaking of which, I recently wrote a related article on this very topic. If you're interested, feel free to check it out for further insights and ideas.

The second tab displays the “Captions” in both .srt and .vtt content (VTT is much like SRT, only with more editing and styling options).

Obtaining the SRT file is a breeze with the user-friendly interface. Simply click the download button provided, or you can conveniently retrieve it from your email inbox. All output files are automatically sent to your email for easy access.

Alternatively, you have the option to copy the entire caption text to your clipboard. From there, you can paste it into a text file and save it as a .srt file. Feel free to choose the method that suits you best.
While most AI tools do their best, it's crucial to take a moment and review all the captions. Editing may be necessary as AI algorithms might not be 100% accurate. It's always recommended to ensure the captions are precisely aligned with your video content.
Putting your SRT File into Action
Now that you have your SRT file ready, it's time to put it to use. When uploading your video to platforms like YouTube or other video streaming services, you can easily include the SRT file for accurate subtitles. Additionally, if you prefer, you can directly embed the SRT file into your video using various video editing software tools. The choice is yours.
As I uploaded the video mentioned above to my YouTube channel, I took the opportunity to include the .srt file for the captions integration. In case you wonder how those captions look like for this video mentioned above, here it is (make sure you click the CC icon on the bottom to see the captions).
You can find a relevant video of this article below.